This chapter contains the following topics:
Use this function to maintain and list Routing File operations that define sequential manufacturing steps required to produce specific Item Numbers. A valid manufactured Item Number and an Operation Sequence Number, with an optional Alternate Number, are required to identify a routing operation. Operation Alternate Numbers specify one or more substitute operation processes that are an alternate method of completing a "regular" operation.
Other programs on this menu allow you to delete all Routing operations for an Item Number, to copy Routing operations for an item to create a Routing for another Item Number, or to post updated information from the Standard Operations File to all Routing records with a matching Standard Operation Number. Routing lists may be displayed on the screen, or printed in a "full" format or "shop order routing" format.
When you select the program, you are first prompted to enter the operation sequence number default increment that you wish to use for the routing records to be added.
Character Mode
A message displayed under this entry explains that:
The operation sequence # will default to
the last used sequence # plus the value of
the above increment.
Press ENTER to accept the increment number displayed from P/D Control Information, or enter another value. If you need to modify your entry, answer Y to "Any change ?", or answer N to proceed.
Graphical Mode
The value set in P/D Control Information is accepted as the default automatically and will be used for data entry. Should you wish to change this default for this one routing, you may do so by selecting Options menu, and choosing Sequence Numbers. This will allow you to do a one-time override to the default sequence.
Select
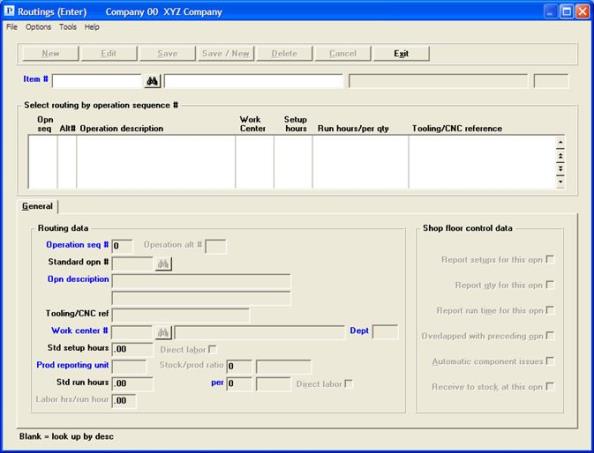
Enter from Routings menu. The following screen displays:

Enter these fields:
Entry Format: Up to 15 alphanumeric characters, or press ENTER to select by description to search for an Item Number by entering any portion of the first 30 characters of its description.
Default: The previous Item Number entry, if any, displays as the default
Validation: Must match a record on the Item Master File, in which case item description is displayed.
After entering the Item number you have the following button options:
| Button | Button Description |
|---|---|
|
New |
Add a new routing. |
|
Edit |
Edit an existing routing. |
|
Save |
Save a new routing or changes to an existing routing. |
|
Save/New |
A combination of the Save and New buttons. |
|
Delete |
Delete and existing routing. |
|
Cancel |
Cancel the adding of a new routing or the editing of an existing routing. |
|
Exit |
Exit back to the menu. |
Routing Data
Press ENTER to accept the increment number displayed from P/D Control Information, or enter another value.
(Operation sequence number)
Entry Format: Up to 3 numeric digits, or Blank to assign the next available sequence number, or <F1> to retrieve next record on file for the item.
If this entry and Item Number match a record on file, the remaining fields are displayed.
Default: If you leave this field blank to add an operation record, the value assigned by the program is the last sequence number used for the item Routing plus the sequence number increment specified on the previous entry screen.
If you enter a Sequence Number for which there is also an Alternate Number already on file, you will be prompted to enter:
Entry Format: 2 numeric digits. The first cannot be zero.
Space is allowed if this field is entered right after Operation Sequence Number. Space will cause the "regular" operation for the Sequence Number to be displayed.
The first digit of Alternate Number designates the alternate process, while the second digit designates the step number within the alternate process. You may define several alternate processes for each "regular" operation, and some alternates may have several operation steps to replace a single "regular" operation.
If this entry, Sequence Number, and Item Number match an alternate record on file, the remaining fields are displayed.
Comments: To add a new Alternate Number, you may first retrieve the "regular" operation for the Sequence Number. In graphical mode select <F5> to add an alternate. In character mode press F2 at "Field number to change ?". The cursor will then move to Alternate Number.
(Standard operation number)
Entry Format: Up to 6 alphanumeric characters, or space.
Validation: If not space, must match a record on the Standard Operations File.
Comments: If you enter a valid number, defaults from the Standard Operation record will display for some subsequent entries when adding an operation.
Entry Format: 1 or 2 lines of description, up to 30 alphanumeric characters each.
Default: If you are adding an operation and you entered a Standard Operation Number, the description from the Standard Operation displays as the default.
(Tooling/CNC reference)
Entry Format: Up to 20 alphanumeric characters, or space.
Default: If you are adding an operation and you entered a Standard Operation Number, the reference from the Standard Operation displays as the default.
Comments: May identify required tools or reference numbers for Computer Numeric Control tapes or programs.
Entry Format: Up to 6 alphanumeric characters. Space not allowed.
Default: If you are adding an operation and you entered a Standard Operation Number and the Standard Operation has a specific Work Center, it displays as the default.
Validation: Must match a record on the Work Center File, in which case the Work Center description displays.
Copy standard times from Standard operation ?
If you are adding an operation and you entered a Standard Operation Number and the Standard Operation has standard times, the program will next ask Copy standard times from Standard Operation ?. If you answer Y, Standard Setup Hours, Production Reporting Unit, and Standard Run Hours data will be automatically entered. Otherwise, you enter:
Entry Format: Up to 2 numeric digits plus 3 decimals, or zero
Press <F1> if you want to enter the time in minutes, after which the program will convert the value entered to hours.
Default: If the Average Setup Hours in the Work Center record is not zero, it will display as the default entry.
If you enter a non-zero value for Setup Hours, the program asks if the setup time is:
Entry Format: Check box where checked is yes and unchecked is no.
Comments: Check the box if you want the time to be included in standard costs which may be calculated from the item Routing. Uncheck the box if the time is indirect labor, but specified for shop loading.
(related to run time)
Entry Format: Up to 4 alphanumeric characters.
Default: If you are adding a record, Stock Unit of Measure from the Item Master displays.
Comments: Production Units may be different than inventory Stock Units produced at machine operations that make multiple inventory units per machine cycle. For example, Stock Unit could be EACH, but Production Unit related to the machine run time standard could be HIT or CYC (for Cycle).
If the Production Unit differs from the item's Stock Unit of Measure, you must enter:
Entry Format: Up to 4 numeric digits, specifying the Stock Units per Production Unit. E.g. 4 EACH/HIT.
There are two methods for entering Standard Run Hours. If in P/D Control Information the answer to the question about using "subtask hours times repetitions" is Y, you enter the following in a windowed area:
Entry Format: Up to 3 numeric digits plus 3 decimals, or zero.
(subtask quantity per, related to subtask hours)
Entry Format: Up to 4 numeric digits. Default value is 1.
Entry Format: Up to 3 numeric digits. Zero not allowed.
When you answer N to "Any change ?", the program calculates Field 10 as Repetitions x Subtask hours / Subtask quantity per.
If the P/D Control Information answer to the question about using "subtask hours times repetitions" is N, you enter:
Entry Format: Up to 3 numeric digits plus 3 decimals, or zero.
Press <F1> if you want to enter the time in minutes, after which the program will convert the value entered to hours.
Comments: If the operation is machine paced, enter the machine hours standard. This may not be the same as run time labor hours, but you will enter the Labor Hours/Run Hours conversion ratio.
If you enter a non-zero value for Run Time Hours the program asks for:
per (per quantity, related to run time hours)
Entry Format: Up to 4 numeric digits. Default value is 1.
Default: The value of 1 displays as the default.
Comments: If the run time hours is for 1 unit of production, enter 1. Otherwise enter the number of production units related to the run time.
Direct labor
Entry Format: Check box where checked is yes and unchecked is no.
Comments: Check the box if you want the time to be included in standard costs which may be calculated from the item Routing. Uncheck the box if the time is indirect, but is specified for shop loading.
Entry Format: Up to 1 numeric digits plus 2 decimals.
Default: If you are adding a record, 1.00 displays as the default entry.
Comments: If a machine is used for the operation, it may require several people (e.g. 2.00 labor hours per run hour), or may require less than a full time person (e.g. 0.50 labor hours per run hour) if one person simultaneously tends several machines.
You are next prompted to answer the following Shop Floor Control questions about the operation, or you may press <F1> at the first question to automatically enter all default answers displayed from P/D Control Information. The entry format for these fields is Y or N.
Shop floor control data
(Report run quantity completed)
Entry Format: Check box where checked is yes and unchecked is no.
Comments: If run quantity is not reported, it is assumed the operation will be unloaded based on production quantity reporting at a subsequent operation.
Entry Format: Check box where checked is yes and unchecked is no.
Comments: Indicates if the operation will occur simultaneously with the preceding operation.
Entry Format: Check box where checked is yes and unchecked is no.
Comments: Indicates if components added at the operation will be automatically issued (backflushed) based on parent production quantity reported and bill of material information. Unless otherwise indicated in bill of material records, components are considered to be used at the first operation.
Entry Format: Check box where checked is yes and unchecked is no.
Comments: Indicates if the quantity reported at this operation will be automatically received to stock and update Shop Order quantity received. If you answer Y, the Operation Sequence Number should be the last on the item Routing.
Entry Format: Up to 99 lines of 45 characters each, in groups of 10 lines per screen.
Comments: If you answer "N" to "Routing instructions used ?" in P/D Control information, you will not be prompted to add instructions.
If you answer "Y" to "Std operation instructions used ?" in P/D Control information, you may optionally copy the instructions on file, if any, for the standard operation number on this routing record. You will be prompted to press F2 to copy standard operation instructions on routing instruction line 1.
If you do use instructions, when you are adding or changing instructions, press <F1> to put spaces in an instruction field and in subsequent fields in the same group of 10. To delete all instructions for a group of 10, press <F1> when the cursor is at the top instruction field.
Use this program to delete all Routing records on file for Item Numbers that you specify.
Select
Delete entire routingfrom Routings menu.
The program requests you to enter Item Number, up to 15 alphanumeric characters, or press ENTER to search for the item by entering its description or any portion thereof. If there are Routing records on file for the item, you are prompted to answer "OK to delete routing operations ?". Answer Y to delete the item's Routing, or answer N to leave the records on file.
Use this program to copy an existing Routing for one Item Number to a Routing for a second Item Number, provided that no Routing records are already on file for the second item.
Select
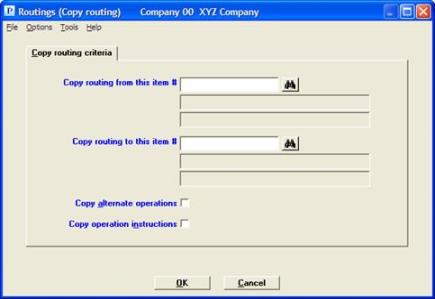
Copy routing from Routings menu. The following screen displays:

The fields you enter are:
Up to 15 alphanumeric characters, matching an item Routing on file.
Up to 15 alphanumeric characters, matching a Manufactured item that does not already have a Routing on file.
Check box, checked is yes and unchecked is no.
Include operation instructions
Check box, checked is yes and unchecked is no.
Select OK to copy the routing or Cancel to return to the menu without the copy.
This program allows you to post current information from Standard Operation records to all Routing operation records containing the Standard Operation Number. This program allows you to select the range of Standard Operations, range of Routings by Item Number, range of Routing Work Centers, and type of Standard Operation data to post.
Select
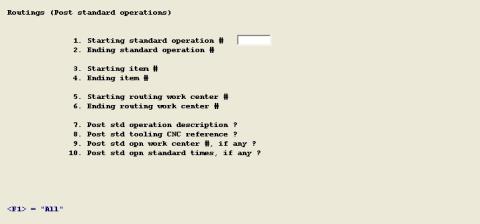
Post standard operationsfrom the Routings menu. The following screen displays:

The data you enter are:
1. Starting standard operation #
Up to 6 alphanumeric characters, or <F1> = "All".
2. Ending standard operation #
Blank defaults to Starting.
3. Starting item #
Up to 15 alphanumeric characters or <F1> = "All".
4. Ending item #
Blank defaults to Starting.
5. Starting routing work center #
Up to 6 alphanumeric characters, or <F1> = "All".
6. Ending routing work center #
Blank defaults to Starting.
7. Post std operation description ?
Y or N.
8. Post std tooling/CNC reference ?
Y or N.
9. Post std opn work center #, if any ?
Y or N.
10. Post std opn standard times, if any ?
Y or N.
If you post standard times and the P/D Control Information answer to the question about calculating run time standards from "subtask hours times repetitions" is Y, the Standard Operations run time values are considered to be subtask standards. These standards will be extended by the "Repetitions" currently in the Routing Operation record to calculate operation standard run time.